


How to Straighten Thick Curly Hair Quickly
Table of Contents
- Prep Your Hair: The Foundation for Speed
- How to Section Hair for Faster Straightening
- Blow-Dry to Reduce Curl Resistance
- Master Flat Iron Technique for Thick Hair
- How to Avoid Heat Styling Damage
- Maintain Straight Hair Overnight
- Time-Saving Hacks for Thick Hair
- Conclusion
Last Updated: August 23, 2026
According to many practitioners in hair styling, straightening thick curly hair quickly requires a strategic combination of preparation, the right tools, and proper technique. The challenge isn't just applying heat, it's reducing the curl resistance before you even pick up a flat iron. This guide walks you through a time-efficient approach that balances speed with the protection your hair actually needs.
Prep Your Hair: The Foundation for Speed
The biggest mistake people make when trying to straighten thick curly hair quickly is skipping preparation. You cannot rush this phase without paying for it later with frizz, damage, or incomplete straightening. Preparation determines everything that follows.
Wash and condition strategically
Start with a clarifying wash if you haven't done one in the past week. Product buildup on thick, curly hair creates a barrier that prevents heat from working efficiently. Use a sulfate-free clarifying shampoo, sulfates strip moisture, and thick curly hair needs every bit of hydration it can get.
After clarifying, apply a moisturizing conditioner and leave it on for at least three to five minutes (the American Academy of Dermatology). Thick curly hair benefits from extended conditioning time because the curl pattern makes it harder for moisture to travel down the hair shaft. Focus the conditioner on mid-lengths and ends, avoiding the scalp.
Rinse with cool water. This isn't optional. Cool water seals the hair cuticle, which reduces frizz and prepares your hair to accept heat more evenly (peer-reviewed research). Warm or hot water leaves the cuticle open and vulnerable.
Towel-dry gently by scrunching rather than rubbing. Aggressive towel drying disrupts the curl pattern and creates frizz before you've even started styling. A microfiber towel or t-shirt works better than a standard bath towel because the texture is gentler on the hair cuticle.
Apply heat protectant for thick curly hair
This step separates quick results from heat damage. A quality heat protectant isn't optional, it's the difference between straightening your hair and cooking it.
Apply the protectant to damp hair before blow-drying. The moisture helps distribute it evenly. Use enough to coat each section, but not so much that your hair becomes heavy or greasy. For thick hair, a dime-sized amount per section is a good starting point.
The CHASKA Moisture Rich Heat Protectant works particularly well for thick curly hair because it combines thermal protection with moisture retention. Look for products that mention "thermal protection" and "moisture" on the label, these address both the heat damage risk and the frizz that thick curly hair naturally experiences.

How to Section Hair for Faster Straightening
Sectioning is where speed actually comes from. Unsectioned hair means you'll go over the same areas multiple times, wasting time and exposing your hair to unnecessary heat. Proper sectioning means each pass counts.
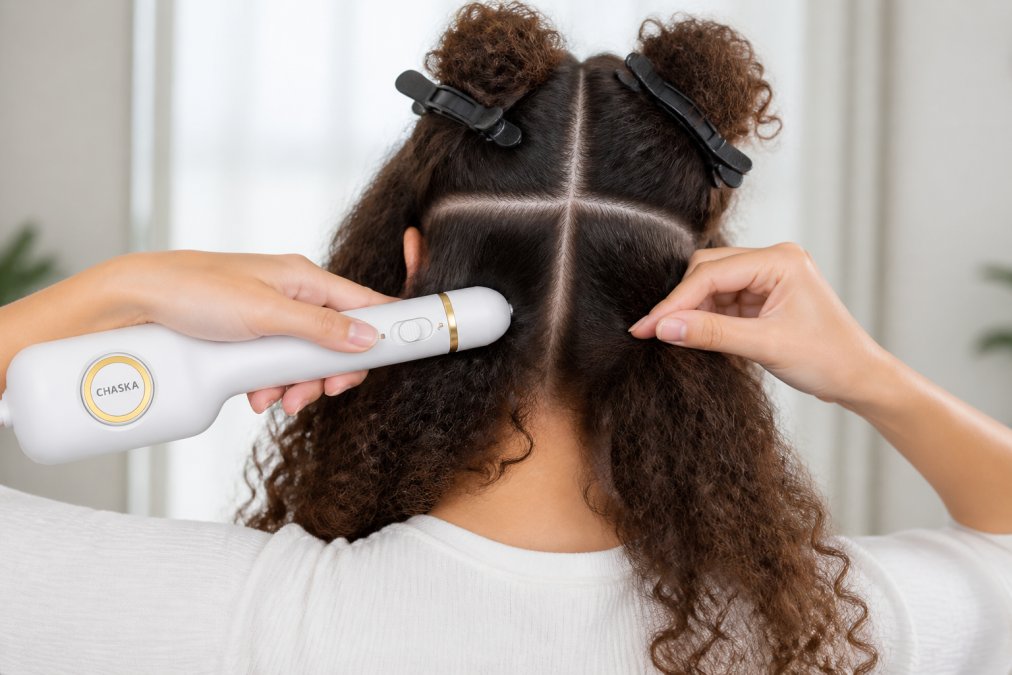
Divide your hair into four to six sections depending on thickness. Start at the nape of your neck and work upward. Use clips to secure each section out of the way. The goal is to work on one small, manageable section at a time so you can apply consistent tension and heat.
For very thick hair, six sections is often better than four. More sections mean smaller working areas, which means better control and faster straightening overall. Counterintuitively, taking more time to section saves time during the actual straightening process because you're not fighting with tangled, unmanageable chunks of hair.
Within each main section, create subsections about one to two inches wide. These subsections are what you'll actually run the flat iron through. Thinner subsections straighten faster and more completely than thick ones because the heat penetrates more evenly through the hair.
Blow-Dry to Reduce Curl Resistance
Blow-drying before flat ironing is the single biggest time-saver for thick curly hair. Many people skip this step thinking it adds time, but it actually cuts total styling time in half because it reduces the work your flat iron has to do.
Blow-dry each section with tension. Use a paddle brush or boar bristle brush to smooth the hair as you dry. The brush creates tension that begins straightening the curl pattern before the flat iron ever touches it. This means your flat iron only has to finish the job, not fight the entire curl from scratch.
Use a blow-dryer with adequate power. A weak blow-dryer leaves too much moisture in the hair, which means the flat iron has to work harder and you risk heat damage from the iron trying to dry and straighten simultaneously. A high-wattage dryer (1800 watts or higher) moves moisture out efficiently.
The CHASKA Air Styler combines drying and straightening in one tool, which simplifies this phase significantly. For people with thick hair who need both steps, having a dryer with real power built into the straightening tool eliminates the need for a separate high-powered blow-dryer. This can cut total styling time.

Master Flat Iron Technique for Thick Hair
Technique matters more than temperature. A correct pass-through technique at moderate heat outperforms aggressive high-heat pressure every time.
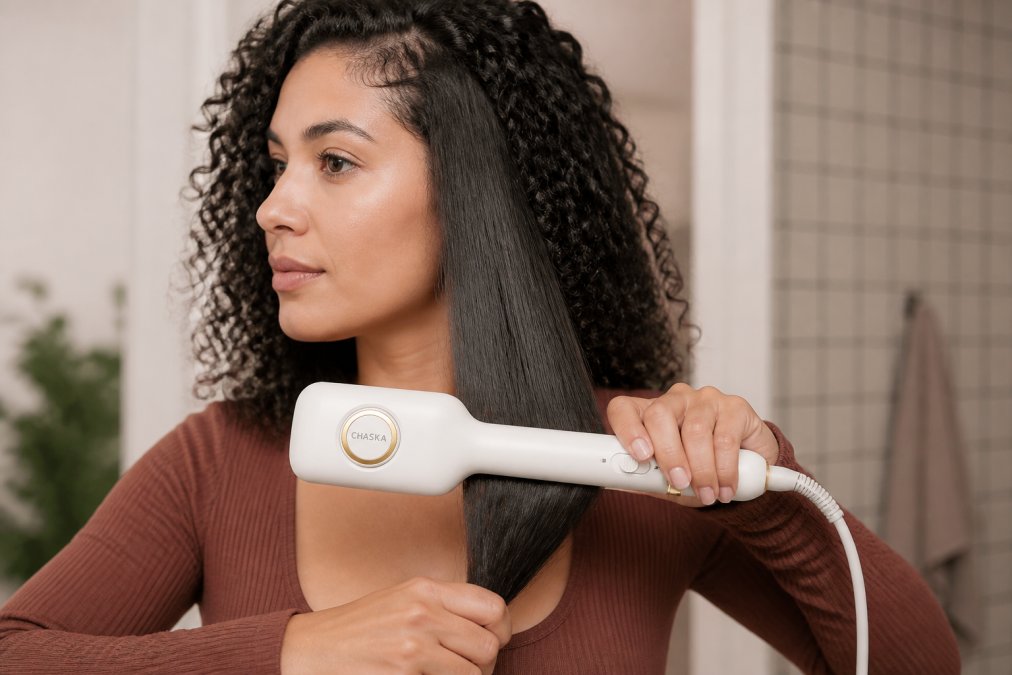
Temperature settings and pass-through technique
Set your flat iron to 350-375°F for thick curly hair (the American Academy of Dermatology). This range is hot enough to straighten efficiently without pushing into the damage zone. Many people assume they need higher temperatures for thick hair, but the issue isn't temperature, it's technique and preparation.
Use the pass-through technique: place the flat iron at the roots, close the plates gently but firmly, and glide downward in one smooth motion. Don't clamp down hard. Moderate pressure with a smooth glide works better than aggressive clamping. Aggressive pressure doesn't straighten faster; it just damages the hair cuticle.
Work section by section, completing each subsection before moving to the next. One clean pass is better than multiple passes over the same hair. If a section isn't straight after one pass, that usually means you need more blow-dry preparation, not more flat iron passes.
For the most efficient straightening, use a flat iron with ceramic plates or tourmaline coating. These materials distribute heat more evenly than basic metal plates. Uneven heat distribution means some parts of your hair straighten while others don't, forcing you to make multiple passes.
Handling puffy roots and dense areas
Roots often puff up because they're the thickest part of the hair and they cool fastest after you've straightened them. Work on roots last, when your hair is fully dry and cool. If you straighten roots while the hair is still damp, they'll revert to curly as the moisture returns.
For dense areas at the crown or back, use slightly higher tension but keep the temperature the same. The issue with dense hair isn't heat, it's that the flat iron plates can't grip and straighten thick bundles of hair as effectively. Thinner subsections solve this better than higher temperatures.
If you notice puffy roots after styling, a light misting with hairspray while the hair is still warm helps. The moisture from the spray and the residual heat allow you to smooth those areas without going back through with the flat iron.
How to Avoid Heat Styling Damage
Heat damage is cumulative. Each time you straighten your hair, you're asking the hair cuticle to withstand temperatures that exceed what it encounters naturally. The goal is to minimize that stress without sacrificing results.
The foundation is a quality heat protectant. This creates a barrier between your hair and the heat source. Without it, heat transfers directly to the protein structure of your hair, which weakens it over time. A heat protectant rated for your hair type makes a measurable difference in how your hair feels and looks weeks after straightening.
Moisture retention matters more than most people realize. Dry hair is fragile hair. Before any heat styling, ensure your hair is well-conditioned. After straightening, apply a leave-in conditioner or serum to the mid-lengths and ends. This replenishes moisture that heat removes and helps your hair recover between styling sessions.
Limit heat styling frequency. If you straighten your hair daily, you're exposing it to significant cumulative heat stress. If you can straighten every other day or three times per week, your hair will be noticeably healthier. The time you save by straightening quickly is offset by damage if you're doing it daily without proper recovery time.
Use lower temperatures when possible. The difference between 350°F and 400°F might seem small, but it's significant for hair health. If your hair straightens well at 350°F, there's no reason to go higher. Higher temperatures don't straighten faster, they just increase damage risk.
Maintain Straight Hair Overnight
Straight hair reverts to curly overnight if you don't protect it while you sleep. The goal is to minimize friction and moisture exposure during sleep.
Use a silk or satin pillowcase instead of cotton. Cotton creates friction that causes hair to curl and frizz. Silk and satin allow your hair to glide smoothly against the pillow without disrupting the straightness. This single change makes a noticeable difference in how long your straightened hair lasts.
If you prefer not to use a silk pillowcase, wrap your hair loosely in a silk scarf before bed. Secure it gently, tight wrapping can create creases that look odd when you unwrap it in the morning.
Apply a lightweight serum or anti-frizz product before bed. This creates a protective layer that resists the moisture your hair will absorb overnight. A dime-sized amount applied to the mid-lengths and ends is enough; too much makes hair look greasy.
Sleep with your hair in a loose braid or bun if you're concerned about reversion. This keeps the hair in a straighter position throughout the night, which helps it maintain straightness better than loose hair.
Time-Saving Hacks for Thick Hair
Speed comes from efficiency, not rushing. These hacks save time without sacrificing quality.
Pre-section your hair the night before if you're in a hurry. Clipped sections hold overnight, so you can start blow-drying immediately in the morning without spending time dividing your hair. This saves five to ten minutes.
Use a quick-dry spray between blow-drying and flat ironing. These sprays accelerate moisture evaporation, which means less time under the blow-dryer. For thick hair, this can cut blow-dry time by several minutes.
Invest in a flat iron designed for thick hair. Tools with wider plates cover more hair per pass, which means fewer passes overall. A standard one-inch flat iron requires more passes on thick hair than a 1.5-inch model. The wider plate saves time without requiring higher temperatures.
The CHASKA Air Styler eliminates the need to switch between a blow-dryer and flat iron. For people straightening thick hair regularly, this consolidation saves several minutes per styling session.
Apply product strategically. Heat protectant on damp hair, leave-in conditioner on ends after straightening, serum before bed. Don't apply everything to the entire head. Targeted application saves product and prevents hair from feeling heavy.
Straightening thick curly hair quickly is entirely achievable when you prioritize preparation and technique over temperature. The foundation, clarifying, conditioning, sectioning, and blow-drying with tension, determines whether you can straighten efficiently. From there, moderate heat with correct pass-through technique delivers results without damage.
The Chaska Life's Air Styler addresses one of the biggest time drains for people with thick hair: switching between tools. By combining drying and straightening functionality, it simplifies the entire process while maintaining the power thick hair requires. If you straighten regularly, a multi-function tool designed for this hair type can offer significant time savings.
Frequently Asked Questions
Q: Is it better to straighten thick curly hair wet or dry?
A: Blow-dry your hair to 80-90% dry before using a flat iron. Partially dried hair reduces frizz and heat exposure time compared to soaking wet hair, and it straightens faster than completely dry curls that resist the iron. This middle ground balances speed with hair health for thick textures.
Q: What is the best heat protectant for thick curly hair?
A: Choose a heat protectant formulated with moisture-rich ingredients that coat the hair cuticle without weighing down thick strands. Apply it to damp hair before blow-drying and again before flat ironing. The CHASKA Moisture Rich Heat Protectant ($24) is designed specifically to protect thick hair during heat styling while maintaining smoothness and shine.
Q: How can I straighten thick curly hair in 5 minutes?
A: Use these speed strategies: section hair into 4-6 parts before starting, blow-dry with a paddle brush to reduce curl resistance, apply a smoothing serum for slip, and use a multi-function tool like the CHASKA Air Styler that combines drying and straightening. Confident pass-through technique reduces the number of passes needed.
Q: How do I fix thick curly hair that feels like straw after heat styling?
A: Over-processed hair needs immediate moisture. Use a leave-in conditioner or hair serum to restore the hair cuticle's smoothness. Going forward, apply heat protectant before every styling session, reduce heat exposure by sectioning efficiently, and avoid multiple passes over the same section. Allow your hair recovery days between heat styling to restore moisture retention and prevent further damage.
This article was written using GrandRanker