


How to Use a Versatile Hair Styler on Wet Hair
Table of Contents
- Step 1: Prep Wet Hair with Heat Protectant Before You Style
- Step 2: How to Section Hair for Faster Drying and Even Styling
- Step 3: How to Prevent Heat Damage on Wet Hair While Styling
- Step 4: Master the Versatile Hair Styler Technique from Root to Tip
- Air Styler vs Flat Iron for Wet Hair: Which Tool Is Safer and Faster?
- Common Mistakes to Avoid When Using a Versatile Hair Styler on Damp Hair
- Conclusion: Styling Wet Hair with Confidence and Consistency
- Frequently Asked Questions
Last Updated: October 3, 2026
Step 1: Prep Wet Hair with Heat Protectant Before You Style
Wet hair is fragile hair. When you learn how to use a versatile hair styler on wet hair, the first move is always the same: apply a heat protectant before the tool touches your head. Skipping this step is the fastest way to cause heat damage, because water inside the hair shaft boils and weakens the strand from within.
At The Chaska Life, we hear one question more than any other: can a single tool really dry and style without frying your hair? Yes, if you prep it first.
Here is the exact order that works:
- Towel-dry gently until hair stops dripping. Never rub.
- Apply a heat protectant from mid-length to ends.
- Comb through with a wide-toothed comb.
- Wait 30 seconds so the product absorbs.
Our CHASKA Moisture Rich Heat Protectant was built for this step. It uses argan oil and vitamin E to form a protective barrier around each strand. Two to three drops handle shorter lengths. Longer hair takes up to a coin-sized amount. Work from the ends upward and avoid the roots.

Step 2: How to Section Hair for Faster Drying and Even Styling
Sectioning is the step everyone skips, and it is the one that saves the most time. Split damp hair into four parts: two at the back, one on each side. Clip each section out of the way. Now your styler only has to manage a small, even amount of hair at a time.
Smaller sections dry faster and style more evenly. You also avoid the classic mistake of running a tool over the same spot again and again, which is where heat damage actually happens.
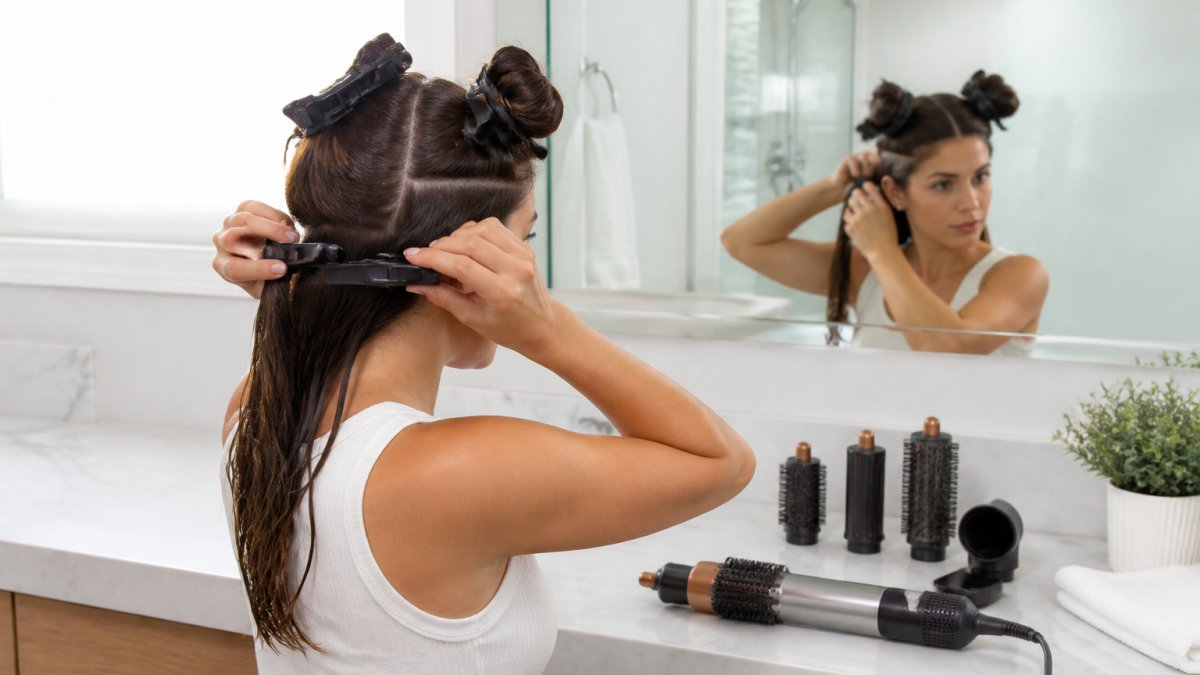
Start at the back. Work forward. This keeps finished sections away from the water and product on the rest of your head.
Step 3: How to Prevent Heat Damage on Wet Hair While Styling
To prevent heat damage on wet hair, you have to control three variables at once: temperature, tension, and time on the strand. Most people only think about temperature, and that is why they still fry their hair.
Here is the mechanism. Wet hair is in a swollen state. Water breaks the hydrogen bonds that give the strand its shape and strength, so the cuticle lifts slightly and the cortex is more exposed.
Temperature ranges that actually work
- Fine, bleached, or already-damaged hair: keep the tool in the low range, roughly 250°F to 300°F.
- Medium, untreated hair: 300°F to 350°F is the working zone.
- Thick, coarse, or highly textured hair: up to about 375°F, and only after the section is mostly dry.
- Anything above 400°F on damp hair is a damage multiplier, not a time-saver.
Dropping the temperature by 50°F and adding one extra slow pass can produce a smoother result than one hot pass, because the airflow does the drying and the plates only do the smoothing.
Porosity changes the risk
This is the part most guides skip. High-porosity hair, the kind that drinks up water fast and dries fast, has a raised cuticle and loses moisture quickly. It absorbs heat faster and scorches sooner, so it needs the lower end of the range and a heat protectant applied in thinner layers.
The rules that matter
- Never hold the tool in one spot for more than a few seconds.
- Keep the tool moving in one direction, root to tip, rather than scrubbing back and forth.
- Let each section dry fully before moving on. A damp core under a smooth surface will frizz within the hour.
- Stop if you hear a sizzle or see visible steam. Both mean the water is boiling inside the shaft.
- Use light tension only. Wet hair stretches, and stretched hair snaps.
The American Academy of Dermatology's hair care guidance notes that heat styling tools cause the most damage when used on hair that is already wet or weakened. That is exactly why prep, temperature control, and porosity awareness matter more than speed.
Step 4: Master the Versatile Hair Styler Technique from Root to Tip
The technique is a slow, deliberate glide, not a quick pass. Clamp a section near the roots, then draw the styler down toward the ends in one smooth motion. The twin turbo fans inside the plates push air directly onto the hair as you go, so drying and smoothing happen at the same time.
CHASKA Air Styler - 3-in-1 Hair Dryer Straightener & Curler with Plasma →
Timing and section size
A section should be no wider than the plate itself, roughly one to two inches. Thicker clumps stay damp in the middle and force repeat passes, which is where damage happens. Expect each section to take about 8 to 15 seconds of continuous glide on damp hair. If it is still wet after that, your section is too thick or your starting hair was too wet. Split it and start over rather than running the tool again.
Technique by finish
- Straight and sleek: Glide root to tip with light tension, then finish each section with a cool pass to seal the cuticle. The cool pass is what locks in shine and keeps humidity from re-frizzing the strand.
- Soft waves: Wrap the section around the barrel, hold a few seconds, then release downward. Do not clamp and drag, or you flatten the wave.
- Defined curls: Work with smaller sections and lower heat, since curl patterns need the shape set rather than the water driven out fast.
- Root volume: Lift at the root for a second or two before gliding down. This is the one place a brief pause is fine, because you are lifting, not drying.
Troubleshooting what went wrong
This is the section most guides leave out, and it is the one that saves your styling session.
- Frizz after a smooth pass: The section was not fully dry at the core, or you skipped the cool pass. Re-dry the section completely, then finish cool.
- Visible steam or a sizzle: Your hair was too wet for the heat setting. Drop the temperature, towel-dry longer, and slow down.
- Steam burns on the scalp or neck: This happens when water runs down from a soaking section into a hot plate. Towel-dry to damp, not dripping, and keep the tool angled away from the scalp.
- Flat, lifeless roots: Too much product at the root or too much tension. Keep protectant from mid-length to ends and lift at the root instead of pressing down.
- Section still damp after two passes: Your sections are too thick. Split them and start again rather than adding heat.
Air Styler vs Flat Iron for Wet Hair: Which Tool Is Safer and Faster?
An air styler is safer and faster on wet hair than a flat iron, and the reason is airflow. A flat iron relies on direct contact heat, so it has nothing to dry the water with. An air styler pushes air through the plates, so it dries and styles in one pass.
Here is how the two compare:
| Feature | Air Styler | Flat Iron |
|---|---|---|
| Best used on | Damp or dry hair | Fully dry hair only |
| Drying method | Direct airflow plus plates | Contact heat only |
| Risk on wet hair | Low with protectant | High, water boils in the shaft |
| Styling range | Dry, straighten, curl | Straighten only |
| Time on damp hair | One pass | Must dry first, then style |
A flat iron on wet hair is a genuine hazard. Water inside the hair shaft hits its boiling point fast, and the resulting steam weakens the strand from the inside. Split ends and breakage follow.
The U.S. Food and Drug Administration's guidance on cosmetic product safety reminds consumers that styling tools should be used as directed to avoid injury and damage.
Our CHASKA Air Styler was designed around this exact problem. It combines a hair dryer, straightener, and curler in one 3-in-1 tool priced at $249.00. The patented heat plate and twin turbo fans deliver direct airflow, so damp hair dries as it smooths. Plasma technology generates negative ions that help seal the cuticle and cut frizz. It works on all hair types, which matters if your texture changes with the weather.

Common Mistakes to Avoid When Using a Versatile Hair Styler on Damp Hair
The most common mistakes all trace back to rushing. Damp hair needs a gentler hand than dry hair, and a versatile hair styler rewards patience with better results. Here is what to watch for:
- Styling soaking-wet hair. Towel-dry first. Dripping hair takes far longer and exposes strands to heat longer.
- Skipping the protectant. No barrier means direct heat on a weakened shaft.
- Using too much hair per section. Thick clumps stay damp in the middle and force repeat passes.
- Cranking the heat to the max. Higher heat does not dry faster. It just damages faster.
- Dragging the tool through tangles. Comb first. Pulling through knots causes breakage.
- Neglecting the tool itself. Wipe the plates and clear the air vents weekly. Dust and product buildup reduce airflow and can scorch.
Conclusion: Styling Wet Hair with Confidence and Consistency
Styling wet hair well comes down to a repeatable routine: protect, section, control the heat, and glide slowly. Do those four things and you get salon-quality results without the damage.
If you want one tool that handles all of it, the CHASKA Air Styler dries, straightens, and curls in a single pass with direct airflow and plasma technology. Pair it with the CHASKA Moisture Rich Heat Protectant for a protective barrier on every strand. Get started with The Chaska Life and cut your styling time without cutting corners on hair health.
Frequently Asked Questions
Can I use a versatile hair styler on soaking wet hair?
Most versatile stylers work best on towel-dried hair, not soaking wet. After washing, gently squeeze excess water out with a microfiber towel and let hair air-dry for a few minutes until it is damp, not dripping. This reduces moisture evaporation time and lets the styler's heat work more efficiently. If your hair is still dripping, the tool has to work harder, which can lead to uneven results and unnecessary heat exposure.
Is it better to style hair when it's wet or dry?
Both work, but wet-to-dry styling with a versatile hair styler saves time because you skip the separate blow-dry step. Damp hair holds shape well and responds to heat-activated styling, which helps with frizz control and a smooth finish. Dry styling gives more precision for touch-ups. If your main goal is speed and reduced heat passes, start with damp hair and a heat protectant.
How do I prevent heat damage when styling damp hair?
Apply a heat protectant like CHASKA Moisture Rich Heat Protectant before styling, keep your tool at a moderate temperature, and avoid passing over the same section more than twice. Work in small sections so heat distributes evenly. Never use a flat iron on wet hair. A versatile hair styler with airflow, such as the CHASKA Air Styler, dries and styles in one pass.
What is the difference between an air styler and a traditional flat iron?
A flat iron uses two solid hot plates to press hair straight. It should never touch wet hair because water boils under the plates and causes steam damage to the hair shaft. An air styler combines heated plates with airflow, so it can dry and style damp hair in one step. The CHASKA Air Styler uses twin turbo fans inside the plates, pushing air through as you glide, which speeds drying and reduces the number of passes needed.